Kitchen islands have evolved from luxury upgrades to practical workhorses in modern home design. They provide extra prep space, storage, seating, and a natural gathering point for family and friends. Ashley Furniture offers a wide range of kitchen islands that balance affordability with solid construction and on-trend styling. Whether someone’s renovating an existing kitchen or furnishing a new build, understanding what Ashley brings to the table, and how to choose the right piece, makes all the difference between a smart purchase and buyer’s remorse.
Table of Contents
ToggleKey Takeaways
- Ashley Furniture kitchen islands offer excellent value between $300–$900, providing solid construction and style without the premium cost of custom cabinetry, making them ideal for budget-conscious homeowners.
- Most Ashley kitchen islands arrive as ready-to-assemble (RTA) pieces requiring basic tools and 1–2 hours to assemble, with material acclimation and proper leveling essential for long-term durability.
- Key features to prioritize include deep drawers (12+ inches), adjustable shelves, soft-close hinges, moisture-resistant countertops, and proper seating height alignment (24-inch stools for 36-inch counter height).
- Proper sizing prevents costly returns—maintain 4–6 feet of clearance around your island, mock up the footprint with painter’s tape, and verify doorway dimensions before delivery to ensure it fits your kitchen layout.
- Ashley’s farmhouse and rustic collections dominate with distressed finishes and X-brace designs, while modern options feature slab fronts and composite tops, each requiring different maintenance approaches and suiting distinct kitchen aesthetics.
- Electrical integration is rarely included on models under $600, so budget $150–$300 for professional electrician work if you need outlets for appliances or phone charging near your island.
Why Choose an Ashley Furniture Kitchen Island?
Ashley Furniture has built its reputation on delivering value-conscious furniture without sacrificing design variety. Their kitchen islands typically feature engineered wood construction (MDF or particleboard cores with wood veneers) rather than solid hardwood, which keeps costs down while still providing stability for everyday use.
Most Ashley islands arrive as ready-to-assemble (RTA) pieces, requiring basic tools, usually just a Phillips screwdriver and Allen wrench. Assembly typically takes 1-2 hours for one person, faster with a helper. Instructions can be sparse, so laying out all hardware before starting saves frustration.
Price points generally range from $300 to $900, depending on size and finish complexity. That positions them well below custom cabinetry ($2,000-$5,000+) but above big-box particle board options ($150-$250) that often wobble after six months of use.
Warranty coverage varies by collection but typically includes one year against manufacturing defects. That’s standard for furniture-grade pieces but won’t cover damage from water exposure, heat, or improper assembly, common pitfalls in kitchen environments.
Ashley’s distribution network means decent availability through their stores, online fulfillment centers, and third-party retailers. Delivery lead times have improved since 2024 supply chain issues, now averaging 2-4 weeks for in-stock items.
Popular Ashley Furniture Kitchen Island Styles and Collections
Ashley refreshes their catalog seasonally, but certain design families remain consistent. Understanding these helps narrow choices quickly.
Farmhouse and Rustic Designs
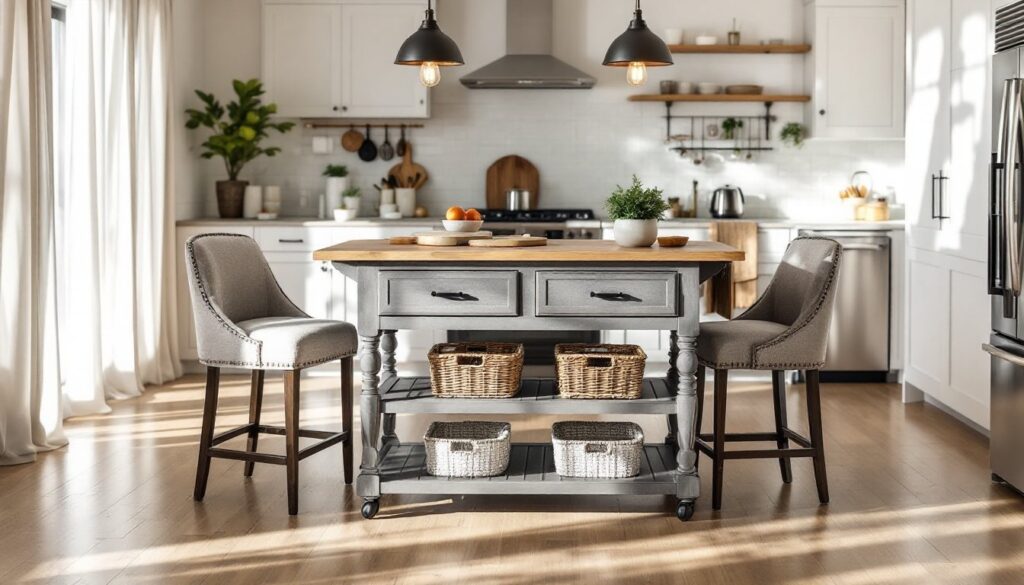
Farmhouse islands dominate Ashley’s lineup, reflecting ongoing demand for that lived-in, reclaimed look. Expect distressed finishes in white, gray, or weathered oak, often with visible wood grain texture applied through wire brushing or hand-scraping techniques.
Common features include X-brace side panels, open shelving for basket storage, and butcher block-style tops (usually oak veneer, not solid butcher block). The Bolanburg and Mirimyn collections exemplify this aesthetic with their planked surfaces and industrial-style hardware.
These pieces pair well with furniture kitchen islands that prioritize function over formality. They work in transitional kitchens where cabinet styles mix traditional door profiles with modern neutrals.
One caution: lighter distressed finishes show wear quickly around high-contact areas like drawer pulls. Plan to touch up with furniture markers or embrace the added patina.
Modern and Contemporary Options
For cleaner lines, Ashley offers islands with slab drawer fronts, minimal hardware (or touch-latch mechanisms), and monochromatic finishes. The Centiar and Garvine collections lean this direction with metal bases, glass inserts, or high-gloss laminates.
Top materials shift toward manufactured stone composites or solid surface alternatives rather than wood-look veneers. These resist staining better but can chip if struck hard, keep that in mind in households with active kids or large pets.
Contemporary designs also tend to incorporate wine racks, stemware holders, and open cubbies for cookbooks. These features look sharp but reduce enclosed storage, so balance visual appeal against practical needs.
Many modern Ashley islands include upholstered stools as matching sets. Check seat height carefully, standard counter height is 36 inches, requiring 24-inch stools, while bar height at 42 inches needs 30-inch stools. A 10-12 inch clearance between seat and counter bottom is ideal.
Key Features to Look for in Your Ashley Kitchen Island
Not all islands serve the same purpose. Identifying must-have features upfront prevents overspending on unused bells and whistles.
Storage configuration matters most. Deep drawers (12+ inches) handle pots and small appliances better than shallow ones. Adjustable shelves beat fixed ones for accommodating tall items. Soft-close hinges and glides cost more but eliminate slammed doors, worth it if noise is a concern.
Countertop material determines durability and maintenance. Engineered wood tops need sealing if they’ll see food prep: look for polyurethane or lacquer finishes rated for moisture resistance. Granite or quartz composite tops (found on higher-end Ashley models) handle hot pans and knife work better but add 50-100 pounds to shipping weight.
Mobility features include locking casters or stationary legs. Wheeled islands offer flexibility for small kitchens but sacrifice stability, they’re not suitable for heavy-duty kneading or if someone plans to lean weight on them. Always engage all four locks during use to prevent rolling.
Electrical integration is rare on Ashley islands under $600. If someone needs outlets for mixers or phone charging, they’ll likely need to hire an electrician to add a power strip mount or run conduit, a $150-$300 job depending on local codes. Some jurisdictions require GFCI-protected outlets within six feet of a sink, so kitchen design planning becomes essential.
Seating capacity depends on overhang depth. A 10-12 inch overhang accommodates knees for casual seating: 15+ inches allows full dining. Most Ashley islands with attached seating areas include this, but freestanding models often have flush edges, limiting their use as eating surfaces.
Weight capacity specs are often buried in fine print. Typical engineered wood tops handle 50-75 pounds evenly distributed. That’s fine for mixing bowls and cutting boards but not for sitting on edges or setting down a filled stockpot without spreader boards underneath.
How to Select the Right Size Island for Your Kitchen
Proper sizing prevents the “too big for the room” mistake that forces returns and restocking fees.
Start with the work triangle rule: maintain 4-6 feet of clearance between the island and surrounding counters, stove, and refrigerator. Less than 42 inches creates bottlenecks, especially if two people cook simultaneously. More than 8 feet defeats the purpose of an island by making it a walk across the room to reach it.
Measure existing floor space with painter’s tape or cardboard to mock up the island’s footprint before ordering. Include the space needed for drawer and cabinet door swings, add 24 inches to the depth if drawers open toward the main work zone.
Ashley islands typically come in three sizes: compact models at 24×36 inches (suitable for apartments or galley kitchens), mid-range at 36×48 inches (the sweet spot for most suburban kitchens), and large formats at 48×72 inches or more (for open-concept great rooms).
Consider ceiling height too. Standard 8-foot ceilings can feel crowded with tall islands (42+ inches to counter top plus overhanging pendant lights). If the kitchen has lower ceilings, a 36-inch counter-height island maintains better proportions.
Doorway and hallway dimensions matter during delivery. Most Ashley islands ship in flat-pack boxes, but assembled dimensions can exceed 30 inches wide. Measure doorways, stairwell turns, and elevator dimensions if applicable. Some delivery services won’t attempt tight turns, leaving the homeowner to figure out assembly in a garage.
Installation and Placement Tips for Maximum Functionality
Even non-structural furniture placement benefits from a methodical approach.
Acclimate the materials before assembly. Leave boxed components in the kitchen for 24-48 hours to adjust to room temperature and humidity. This reduces the chance of joints loosening or panels warping after assembly, a common issue with engineered wood in climates with high seasonal humidity swings.
Assemble on a protected surface, old blankets or cardboard, to prevent scratching floors during construction. Follow torque specs in the instructions: over-tightening cam locks or confirmat screws can strip particleboard threads. If screws strip out, toothpicks and wood glue can salvage the hole, but it’s better to get it right the first time.
Level the island after positioning it. Most Ashley models include adjustable leg levelers (threaded feet that twist to raise or lower corners). Use a 24-inch or longer level across both axes. An unlevel island causes doors to swing open and makes rolling prep work (like dough or pastry) frustrating. Floors often aren’t level, especially in older homes, so expect to adjust.
Anchor if necessary. Freestanding islands don’t typically require anchoring to floors, but top-heavy designs (especially those with granite tops or tall wine racks) can tip if someone leans heavily or if children climb. Simple L-brackets screwed into the baseboard or floor joists add security. In rentals where drilling isn’t allowed, consider furniture anchoring straps rated for earthquake zones, they stick with heavy-duty adhesive and prevent tipping.
Protect the finish immediately. Apply furniture paste wax or a topcoat sealer to exposed wood surfaces, especially around sink or cooktop zones if someone’s repurposing the island near water sources. Clean spills quickly, engineered wood swells when saturated, and warranty won’t cover moisture damage.
Lighting and task zones deserve planning. If the island will serve as primary prep space, ensure overhead lighting (pendants or recessed cans) provides at least 50 foot-candles of illumination at counter level. Under-cabinet or under-overhang LED strips add task lighting without major electrical work.
For DIYers comfortable with woodworking, building a simple island from scratch offers full customization of dimensions and materials, though it requires tools like a miter saw, drill press, and pocket hole jig. Ashley’s ready-made options suit those who want results in an afternoon without sawdust cleanup.
Finally, consider future changes. If a kitchen remodel is on the horizon within 2-3 years, a mobile island on casters makes more sense than a heavy stationary piece. Ashley’s mid-price furniture-grade construction holds value well enough for resale on local marketplaces but isn’t heirloom quality, plan accordingly for how long the piece needs to perform.